 |
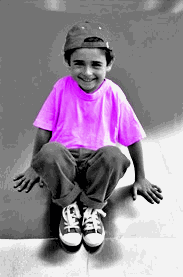 |
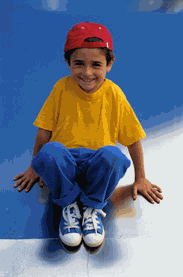
| Original picture | Highlighted picture |
Step |
Action |
1 |
Open your image. For this example I used an RGB stock photo at 72 pixels/inch. |
2 |
Select the area to highlight. Use any of the selection tools with anti-aliasing turned off. I used the magic wand with a tolerance of 32. By holding down the shift key, I kept adding to my selection by clicking in different areas of the shirt. |
3 |
Save the selection. Select à Save Selection. Channel:new. Select OK. |
4 |
Deselect. Ctrl+D (Cmnd+D on Mac) |
5 |
Change the image to grayscale. Image à Mode à Grayscale. Select OK. |
6 |
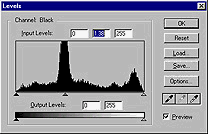
Adjust the levels.
Image à Adjust à Levels. Set midtone slider to middle of large center clump. Select OK. I find that setting the midtone lighter gives a truer sense of b&w photography than just changing the mode to grayscale. It will also help in some of the following steps. |
7 |
"Enhance" the picture. Filter à Sharpen à Unsharp Mask. This step is not necessary but creates a pop to the picture that enhances the overall effect. For this example I used settings of amount:100%, radius:9.4 and threshold:0. |
8 |
Change the image to RGB. Image à Mode à RGB. Select OK. |
9 |
Load the saved selection. Select à Load Selection. Channel:#4. Select OK. |
10 |
Feather the selection. Select à Feather. Feathering the selection slightly will blend the color into the background image. You can also expand the selection by a pixel or two before feathering. Try a couple of variations if the "coloring" doesn't look like it's fitting very well. I used a feather setting of 1 pixel. |
11 |
Select the color to fill. Select the foreground color box in the tool palette. Choose the color you want. Select OK. Bright colors seem to work better. Of course this is up to your personal tastes. Have fun, try something you wouldn't normally associate with your picture. |
12 |
Fill the highlight area. Edit à Fill. Foreground Color, opacity:100%, mode:color You can try other mode settings such as hard light for different fill effects. |
13 |
Adjust the saturation of the fill. Image à Adjust à Hue/Saturation Again, this step is up to your personal preferences. Just be aware that while the selection is still active, you can do different adjustments to your highlight. For this example I set the saturation to +100. |
14 |
Save your image as a new file. File à Save As |